I am a huge gamer and I love to tinker and mod things, so I decided to start a blog showcasing some of my work and favorite gadgets. Maybe this could give people ideas and provide some help for anyone that is looking to do the same thing. Enjoy!
***First off, before you start reading this, be aware that I am not a fanboy of any particular console or device. I ENJOY ALL OF THEM!!!...for different reasons***
XCM Cross Battle adapter for PS3
I know this might be kind of old news to most, but some may find this interesting. I have been using this for a while and find it pretty awesome since I am not a big fan of the PS3 analog sticks for FPS games. I usually play FPS games on my Xbox/Xbox 360 as I have since the original Halo. Therefore I am a big fan of the offset analog sticks, button layout, and triggers.
When I first tried to play Call of Duty on the PS3 controller, it did not feel comfortable at all. Which is the reason I did a little searching and came upon this device. It allowed me to hook up a wired Xbox 360 controller to use on the PS3.
Using the XCM Cross Battle adapter allowed me to play with my PSN friends on the Playstation 3 while still being able to use the controller I was more comfortable with.
Like many people, I was, and still am a big fan of video games which included console and arcades. Though arcades are pretty much dead in the US, but still popular overseas. I have always wanted to own one as it gives a nostalgic feel and feeling that you don't get when playing on a console.
Since it is not really feasible to purchase one of every arcade game that you enjoy, a MAME machine is a great alternative. When the time came that I was able to start a project of this size, I began searching for project plans to build my own cabinet and also began searching various outlets to purchase a older cabinet. By chance, I found a seller(who happened to be an arcade repair guy) on Craigslist that was selling empty shells, since he already gutted them and no longer needed them. He had 2 on sale, a Mortal Kombat 2 and War: Final Assault(which I never heard of). Contacted seller stating that I wanted both, and if he could deliver. I was then notified that MK2 was already sold and only had War left, which he could deliver.
Picture shown is what the game originally looked like(not the one I bought)
These 3 pictures show what the cab looked like when I first got it. It was in awesome condition by the way. It was basically all I needed to start the project, minus the control panel since it was for a mech game as shown in the very first pic.
I then began stripping it down to its bare and removed everything that I did not need, since the original harness and control panel wires were still inside.
I then purchased an older CRT tv($30 at pawn shop) to place into the shell, as arcade monitors are harder to come by and very pricey(around $200 for a 25"). Plus I would need to purchase another harness if I used a arcade monitor as they are usually VGA inputs, while the Xbox uses a RCA. A bit of modification was needed as the TV would not fit into original mounts.
CRT after shell was removed
CRT in the cab after a lot of modifications and some help from a couple friends
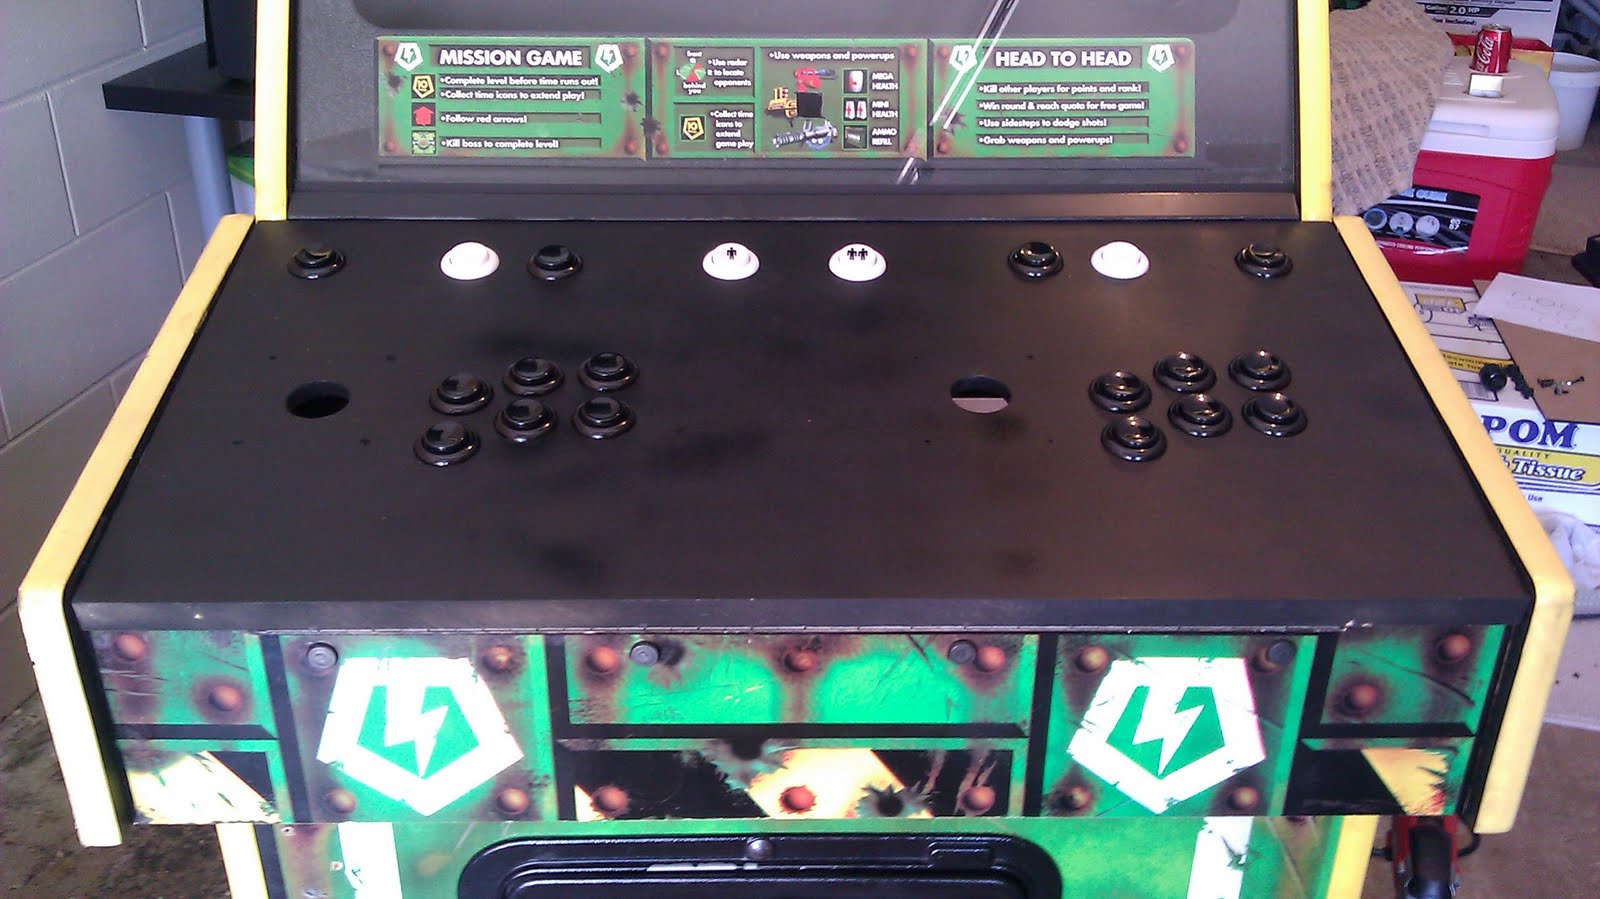
I then had to build a control panel from scratch as the original cp was for a mech game. I just purchased a sheet of MDF from Home Depot and had them cut the piece I needed with my measurements from original cp. After testing measurements for new cp, I had to then measure for a proper arrangement for the joysticks and button layout that I wanted. I went with a button layout rather than the old in-line layout that is used in games like Street Fighter 2. To drill the holes, I just used a hole saw attachment on my power drill.
**Note: The internals which include the original joysticks and buttons were taken from an X-Arcade joystick(see here) with Xbox adapter(see here) which can be found at links provided and also from www.xgaming.com.**
Testing to make sure that measurements were correct
New control panel after drilling was complete
Only thing left to do was to paint the CP, put in new joysticks and buttons, and wire everything up.
Control Panel after paint and buttons installed...
under CP, lots of wires and joystick
...joysticks installed
Wiring Completed!!
Finished product!! (yellow dots are labels I used for the wires)
This was actually completed about 2 years ago, but I finally decided to start a blog showcasing and describing my projects.
The idea for this stick came about after purchasing a MadCatz Street Fighter 4 SE stick. I was not satisfied with the stock knockoff joystick and buttons, so I decided to upgrade them to official Sanwa parts. I then ended up with the original parts as extras after Sanwa parts were used in place.
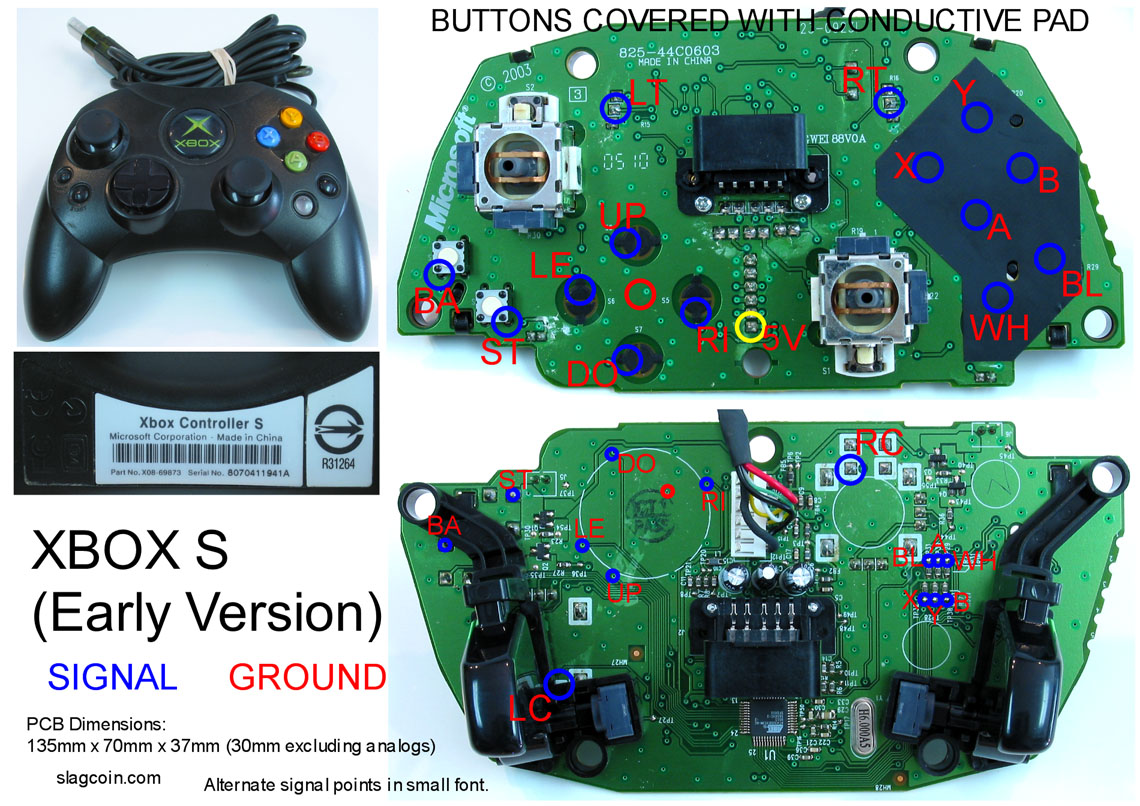
Around the same time, I had a Xbox 360 that decided to Red Ring on me, which deemed it unusable since it was out of warranty and after attempting to repair myself. I then thought how cool it would be to have a joystick using the Xbox case since I basically had all of the necessary except for a way of connecting to Xbox, so I decided to take apart a Xbox controller as it would also allow for using it wireless.
I did not have a diagram at time of doing this mod(it was all trial and error). I did find one recently if anyone needs it as a reference(xbox s diagram). The site provided also has many other controller diagrams covered if you were to work on a joystick for another console.
I basically just wired up each button of the controller as shown (this was a pain as the connections for the soldering points were tiny) and hooked directly to corresponding button on the joystick. As far as the joystick casing goes, I used the entire shell including the metal casing that the motherboard was mounted to. This was to add some weight to the joystick as it was a little light for my taste without it.
After all of the main wiring was complete. I wanted to make use of the power button and lights on the front of the Xbox case. My original plan was to hook up the 4 lights on the power button to the corresponding 4 on the controller, but this didn't work since the cover that goes on top did not allow for too much space. Now that I think of it, I could have just dremeled it(maybe on V.2). I then just wrapped it up by wiring a button for both START and sync(since it was wireless, otherwise I couldn't use on any other xbox) that could be pressed in the hole that was originally for the power supply.
This basically sums up all of the work that went into the mod. Feel free to send me any questions that you may have if you want to attempt this same mod, since I'm pretty sure almost everyone has had a RROD Xbox 360. Don't forget to check out the video and subscribe.


